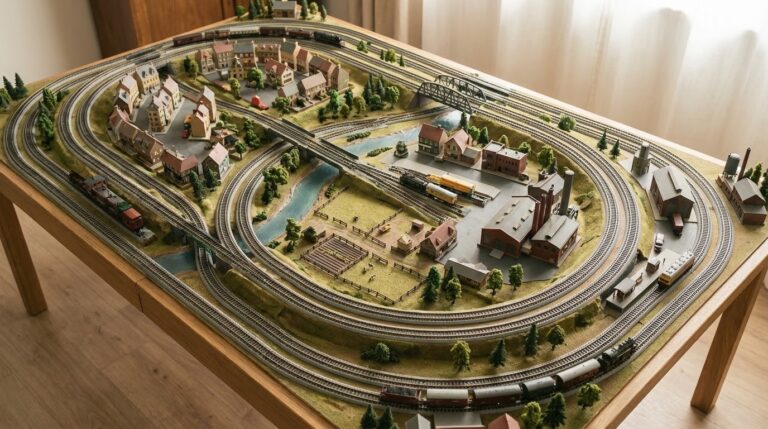
Realistic Scenery Techniques
Scenery transforms model railroads from track on plywood into believable miniature worlds. The difference between amateur and professional-looking layouts usually isn’t the trains—it’s the scenery. Well-executed terrain, vegetation, and details create context that makes your railroad real. This guide covers techniques that work, from basic ground cover to advanced weathering.
The Foundation: Terrain and Landforms
Before grass and trees, you need terrain. The underlying land shapes everything else.
Foam Construction
Extruded polystyrene foam (XPS) has become the preferred terrain material for many modelers. It’s lightweight, easy to shape with simple tools, and accepts scenery materials well.
Start with sheets stacked to approximate your terrain. Use a hot wire cutter or serrated knife to shape contours. Rasp tools smooth surfaces. A hot air gun softens foam for organic shaping. The goal is convincing landforms—hills that roll naturally, cuts that show proper geology, grades that appear intentional.
Plaster Cloth and Hard Shell
Traditional hard-shell scenery uses crumpled newspaper or cardboard webbing covered with plaster-soaked cloth or Hydrocal castings. This creates a rigid terrain shell that accepts ground cover and vegetation.
Plaster cloth (like Woodland Scenics’ Plaster Cloth) provides quick coverage. Dip strips in water and apply over terrain forms. Multiple layers increase strength. The surface dries hard and paintable.
Rock Formations
Rocks anchor believable scenery. Real geology shows layers, fractures, and weathering patterns. Model rocks should suggest the same.
Rubber rock molds produce consistent formations. Pour Hydrocal or lightweight plite into molds, let set, pop out, and install. Paint with washes—dark in crevices, lighter on faces. Or carve rocks directly into foam using references from your prototype region.
Key tip: rocks cluster together in natural formations rather than scattering randomly. Study real cuts and outcrops, then replicate the patterns.
Ground Cover: The Earth Itself
Ground cover creates the base layer that everything else sits upon.
Painting the Terrain
Before adding texture, paint your terrain. Earth tones—browns, tans, ochres—provide a base that shows through ground cover gaps. Vary colors across the layout; real earth isn’t uniform. Raw umber, burnt sienna, and yellow ochre acrylics mixed and applied in washes work well.
Ground Foam Application
Ground foam—the colored foam particles from Woodland Scenics, Scenic Express, and others—simulates grass, earth, and vegetation. Application is straightforward:
- Brush diluted white glue (approximately 50/50 with water) onto the area.
- Sprinkle ground foam over the wet glue.
- Pat gently to embed foam.
- Let dry completely.
- Remove excess with vacuum or soft brush.
- Seal with diluted matte medium or “wet water” (water with dish soap to break surface tension).
Varying Textures and Colors
Real landscapes show variation. Grass isn’t one shade of green. Earth shows patches of bare dirt among vegetation. Model this variation by layering different foam colors and textures. Blend yellow-green with dark green. Add brown patches. Create transitions rather than uniform carpets.
Static Grass
Static grass applicators revolutionized ground cover. These devices charge grass fibers electrostatically, causing them to stand upright when applied to glue-covered surfaces. The result mimics real grass far better than flat ground foam.
Apply glue to your terrain. Hold the applicator close to the surface and activate. Fibers stand up as they contact glue. Vary fiber lengths—shorter for mowed areas, longer for wild growth. Multiple colors blended together look most realistic.
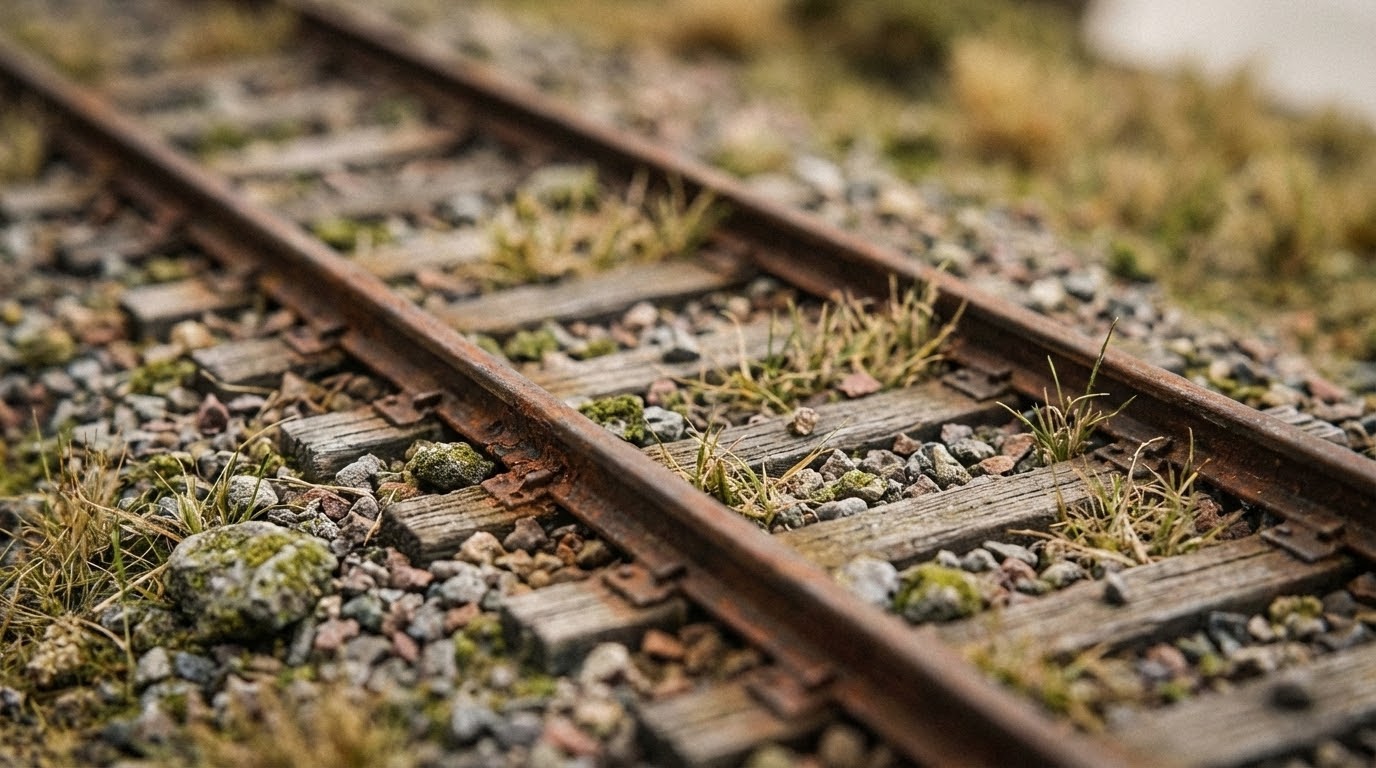
Ballast: Track That Looks Real
Unballasted track immediately looks like a toy. Proper ballasting takes time but transforms your railroad.
Choosing Ballast
Ballast comes in various materials and colors. Match your prototype—different railroads used different stone colors. Western lines often show gray granite; eastern lines may show brown or rust-colored stone. Fine ballast suits N scale; medium works for HO.
The Ballasting Process
- Clean track thoroughly – Remove any debris or residue.
- Spread dry ballast – Pour ballast alongside and between rails. Use a brush to distribute evenly.
- Shape the profile – Ballast should slope from the tie ends to the roadbed edge. Keep rail tops and insides clear.
- Apply wet water – Mist with water containing a drop of dish soap. This helps glue penetrate.
- Apply diluted glue – Use an eyedropper or syringe to apply diluted white glue or matte medium (approximately 50/50). Let it wick into the ballast.
- Let dry completely – 24 hours minimum before running trains.
- Clean rail tops – Remove any glue film from rail surfaces.
Weathering Ballast
New ballast looks too clean. Real ballast collects rust, oil drips, and dirt. Weather your ballast with diluted paint washes—browns and rust colors between rails where locomotives drip, darker tones around turnouts and heavy-use areas. Light dustings of weathering powders add further realism.
Trees and Vegetation
Trees dominate most North American landscapes. Getting them right matters enormously.
Commercial Tree Options
Ready-made trees range from cheap plastic pine trees (avoid these) to premium hand-built specimens. Mid-range options like Woodland Scenics Realistic Trees and premium offerings from companies like Grand Central Gems provide good starting points.
Building Your Own Trees
Custom trees look better and cost less per unit at volume. Common techniques include:
Twisted wire armatures: Twist multiple wires together for trunks, separate into branches, cover with floral tape or texture paste, spray with adhesive, and cover with fine-leaf foliage or poly-fiber clusters.
Natural materials: Dried yarrow, baby’s breath, and other plants provide armatures. Dip in glue, cover with ground foam or fine foliage, and create convincing trees inexpensively.
SuperTrees: Scandinavian moss sold as SuperTrees mimics deciduous tree foliage. Attach to wire armatures with adhesive and ground foam.
Tree Placement
Trees grow in patterns. Forest edges show younger, denser growth. Specimen trees stand alone in fields. Tree lines follow fence rows and watercourses. Study real landscapes and replicate the patterns rather than planting randomly.
Vary sizes and species. A forest of identical trees looks artificial. Mix deciduous and evergreen where appropriate to your region. Include dead trees and stumps—real forests have both.
Water Features
Rivers, streams, ponds, and puddles add visual interest but require careful technique.
Preparing the Waterway
Paint the waterway bottom before adding water medium. Dark colors—deep blue-green, almost black—suggest depth. Lighter colors near edges show shallows. Add underwater details: rocks, logs, submerged vegetation.
Realistic Water Materials
Several products create convincing water:
Envirotex Lite / Epoxy: Two-part epoxy poured in thin layers creates deep, clear water. Multiple pours build depth. Disadvantage: cannot be reworked once set.
Woodland Scenics Water Effects: This acrylic product creates surface ripples and waves. Apply over base water layers for texture.
Realistic Water: Single-pour acrylic products that self-level and dry clear. Easier than epoxy but shallower per application.
Gloss Medium: Basic matte medium or acrylic gloss creates simple water surfaces inexpensively. Multiple thin coats work better than single thick applications.
Moving Water Effects
Waterfalls, rapids, and streams need to show motion. Woodland Scenics Water Effects, brushed in the direction of flow, creates convincing surface texture. White paint stippled on rapids suggests foam. Fiber optics or gloss gel below falls suggests mist.
Structures and Details
Buildings, vehicles, figures, and details populate your scene. Their treatment dramatically affects realism.
Structure Weathering
New model buildings look toy-like. Real buildings show weather exposure, use wear, and age. Basic weathering transforms them:
- Wash with diluted paint: Thin black or brown acrylics pooling in corners and seams suggest grime accumulation.
- Drybrush highlights: Light colors on edges suggest sun bleaching and wear.
- Weathering powders: Rust, dust, and soot powders brushed on surfaces add dimension.
- Streaking: Vertical streaks below windows and rooflines suggest rain washing.
Detailing Structures
Details bring buildings to life:
- Add window glazing (clear plastic sheet behind window openings)
- Install interior lighting with LEDs
- Place interior details visible through windows
- Add signs, posters, and business-specific details
- Include loading dock clutter, trash cans, and exterior equipment
Figures
People bring scenes to life. Position figures doing something—walking, working, waiting. Group figures in logical arrangements. Paint flesh and clothing to avoid the unpainted plastic look. Even basic painting dramatically improves figure appearance.
Vehicles
Period-appropriate vehicles anchor your era. Weather them appropriately—new show-quality cars for auto dealers, dusty work trucks for construction sites. Position vehicles logically: parked in lots, stopped at crossings, moving along roads.
Weathering Rolling Stock
Factory-fresh locomotives and freight cars look wrong in realistic scenery. Real railroad equipment shows hard use.
Basic Weathering Techniques
Washes: Thin paint (1 part paint to 10 parts thinner) applied over surfaces settles in panel lines and recesses, adding depth and grime.
Powders: Weathering powders (from MIG, AK Interactive, Bragdon) brushed on surfaces create rust, dust, and exhaust staining. Seal with flat clear coat.
Airbrushing: Light overspray of dust, rust, and grime colors creates overall weathering effects. Build up gradually.
Specific Effects
- Rust: Concentrate on trucks, underbodies, and any exposed metal. Vary rust colors—fresh rust is orange, aged rust goes brown to black.
- Dust: Tan and earth tones on lower car sides and trucks suggest road dust. More in arid regions, less in wet climates.
- Oil and grease: Dark staining around trucks, journal boxes, and under locomotives from lubricant drips.
- Exhaust: Diesel locomotives show exhaust staining trailing back from stacks. Airbrush grimy black following exhaust flow patterns.
How Much Weathering?
Match weathering to your era and railroad. Modern railroads maintain equipment better than 1970s-era deferred maintenance. Unit trains stay cleaner than local switching equipment. Research prototype photos of your era and region.
Backdrop and Lighting
Background treatment and lighting affect scenery perception more than most modelers realize.
Backdrops
A painted or photographic backdrop extends your scene beyond the layout edge. Options include:
- Painted sky: Graduate from horizon white through pale blue to deeper blue overhead. Add clouds if skilled.
- Photographic backdrops: Commercial photo backdrops show realistic scenes. Match lighting and perspective to your layout.
- Printed graphics: Custom-printed backdrops featuring your specific prototype area provide maximum realism.
Layout Lighting
Poor lighting destroys good scenery; good lighting enhances modest scenery. Key principles:
- Consistent color temperature across the layout (3500-5000K daylight range)
- Even illumination without harsh shadows
- No visible light fixtures in the viewing angle
- Consider valances to hide lighting and transition to backdrop
LED strip lighting has simplified layout illumination. Install strips in valances directed down onto scenery. Diffuse with frosted covers if needed. Multiple strips spaced evenly eliminate shadows.
Working in Phases
Scenery overwhelms if approached as one giant project. Work in phases.
Complete Sections Fully
Rather than spreading incomplete scenery across the entire layout, complete individual sections fully. Finish one town, one hillside, one industrial area. This provides satisfaction, maintains motivation, and reveals techniques you’ll apply elsewhere.
Establish a Workflow
Develop a consistent process:
- Terrain shaping
- Base painting
- Track ballasting
- Ground cover
- Vegetation
- Structures
- Details
- Weathering and finishing
Following a workflow ensures you don’t miss steps and allows batch processing (doing all ballasting at once, for example).
For overall layout planning that accommodates scenery space, see our Layout Design Tips guide.
Frequently Asked Questions
How long does it take to complete scenery? +
Scenery timelines vary enormously based on detail level and layout size. A basic 4×8 layout might be scenicked in 20-40 hours with simple techniques. A highly detailed section of equivalent size could take 100+ hours. Most modelers underestimate scenery time. Budget liberally. The good news: scenery work proceeds incrementally with visible progress, maintaining motivation better than endless benchwork or wiring projects.What’s the most important scenery technique to master first? +
Ground cover application provides the highest impact for effort invested. Properly colored and textured ground immediately transforms bare plywood into landscape. Master basic foam application and static grass before tackling complex techniques like water or rock carving. Good ground cover makes average everything else look better; poor ground cover undermines excellent structures and vegetation.Should I weather all my rolling stock? +
Not necessarily all at once, but weathered equipment looks far more realistic in scenicked settings. Start with freight cars—they show the most wear and weathering mistakes are less visible. Locomotives require more care given their cost and visibility. Match weathering intensity to your era: heavy for 1970s, moderate for modern. Keep some equipment clean for variety—new cars and freshly repainted equipment exist on real railroads.How do I match scenery to my prototype region? +
Research is essential. Study photographs of your prototype area extensively. Note vegetation types, terrain colors, rock formations, building styles, and atmospheric conditions. Google Street View provides invaluable reference for specific locations. Match ground cover and vegetation to regional characteristics—desert Southwest differs dramatically from New England. Even general “Eastern” or “Western” U.S. modeling benefits from regional awareness in color selection and plant choices.Can I fix scenery mistakes? +
Most scenery is forgiving. Ground foam lifts with warm water and scrubbing. Static grass pulls out with tweezers. Structures move. Even water effects can sometimes be removed or covered over. The exception is plaster or foam terrain shaping—once set, major changes require cutting and rebuilding. Test techniques in inconspicuous areas first. Accept that scenery evolves—what looked good last year may be improved as your skills develop.
The Journey to Realism
Realistic scenery develops incrementally. Your first attempts won’t match magazine photos—and that’s fine. Each scene teaches something applicable to the next. Techniques that seemed difficult become routine with practice.
Study layouts you admire, analyze what makes them work, and apply those lessons. Watch scenery tutorials from master modelers. Experiment with new products and techniques. Accept imperfection while striving for improvement.
Most importantly, remember that scenery serves the railroad. A running train through modest scenery provides more satisfaction than a static masterpiece without operational capability. Build scenery that enhances your enjoyment—whether that means museum-quality detail or simply covering the plywood so trains have somewhere to go.
The scenery journey never really ends. Every layout offers opportunities for refinement, and every modeler continues learning. That ongoing engagement is part of what makes model railroading a lifelong pursuit.
For beginners starting their scenery journey, our Getting Started with Model Railroading guide provides the broader context for integrating scenery into your layout plans.
Affiliate Disclosure: Off The Rails participates in affiliate programs. Links to products may earn us a commission at no extra cost to you. We only recommend products we genuinely believe benefit the hobby.